- Trails
-
Bikes
-
Gear
-
Tips & Tricks
-
About us


Raising the handlebars on a road bike isn’t very challenging, and the write-up below walks you through the simple steps required.
In addition to being uncomfortable for cyclists, WebMD Trusted Source Uncomfortable on Bike? Check Handlebars People who spend a lot of time on bicycles or in indoor cycling class often complain of genital numbness, and now a new study in women suggests that low handlebars may be at least partly to blame. www.webmd.com asserts that low handlebars share part of the blame for genital numbness in bikers, especially for women. The possible reasons for the low handlebars are that you either bought a small bike for your size or bought it in the right size but in a design that doesn’t match your riding style.
Also, your riding style may change due to circumstances only to find that your handlebar position doesn’t support your new style. If this is true for you, you’ll need to know how to raise handlebars on a road bike so you can correct the situation, and you can learn how using the information below. This skill may not be needed as often as knowing how to tighten a bike chain, how to use a bike pump, or how to add air in bike tires. However, it can occasionally save you some money.
 Quill stem bikes are harder to come by these days compared to their threadless stem counterparts. You’re more likely to see them on older/vintage-style and kid’s bikes. However, they’re also available in a few entry-level mountain and hybrid bikes.
Although this is debatable, some cyclists feel that these bikes are easier to work with when raising the handlebars. What really differentiates quill stem bicycles from the alternative is the inclusion of threads on the bicycle steerer tube. We will get into the details of this shortly while explaining the anatomy of a quill stem bicycle.
Typically, you see these bikes with two large nuts either covered or uncovered at the top of the head and steerer tubes. If you’ve studied the anatomy of a bicycle, the head tube is the front part of the frame. It also tends to be attached to both the top tube and down tube.
Notably, the steerer tube goes through the head tube to the top. The threads are located at the top end of this steerer tube. The two nuts we mentioned above are wrapped around these threads at the top of the steerer tube.
The stem goes into the steerer tube with a wedge bolt included at the bottom that’s meant to hold the stem in place. There’s also a bolt on the top of the stem that can be used to adjust the wedge bolt.
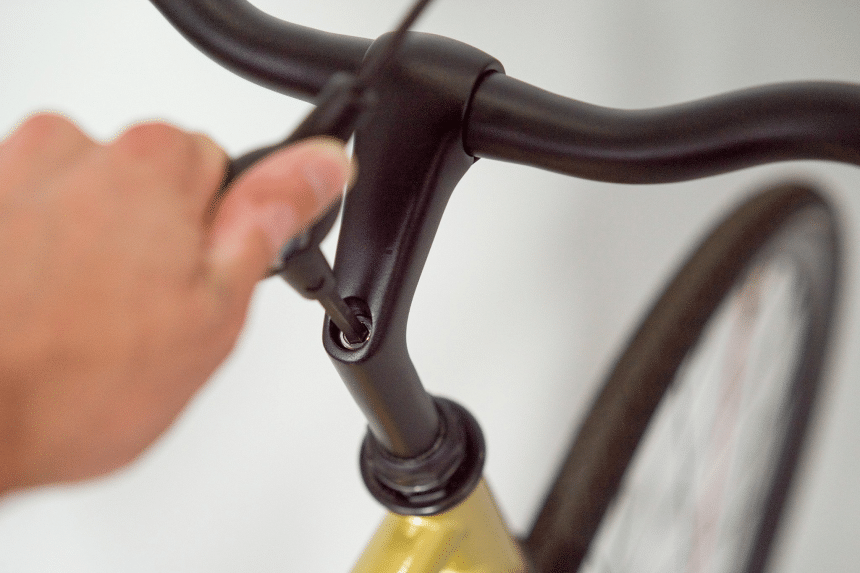
The easiest way to lift handlebars on a bike like the Trek Precaliber 20 or other model is to loosen the top bolt, which will also loosen the wedge bolt at the bottom.
Often this can be done by using a six mm Allen key to turn the top bolt counter-clockwise. According to reviewers, the REXBETI Allen Wrench Set is one of the go-to sets for such a tool. It comes with 35 hex keys in different sizes made with heat-treated steel. The six mm option is one of the Allen keys in the set, and they all have a ball end design that helps access pocket cap screws more easily.
Once loose, the stem should move freely up and down the steerer tube. Of course, in this case, you want to move it up, so you’ll pull it upwards.
Manufacturers also include a marker for the maximum insertion point on the stem. Pulling the stem up past this point is highly discouraged since it can cause damage. Once the stem is at an appropriate height, you only need to use your Allen Key to retighten the top bolt while ensuring you keep it perfectly aligned with the wheel in front of it.
If you don’t want to overtighten the top bolt and damage the road bike in the process, you may want to use a specialized tool like a clicker wrench. According to Hex Technology Trusted Source The Clicker Wrench Guide: Torque Ranges, Calibration and More - Hex Technology Clicker-type torque wrenches are the most common tools used in industrial bolting. Here’s everything you know to use them correctly. www.hextechnology.com , clicker wrenches can help you adjust the applied force in a set range, so you don’t overtighten or under-tighten.
Users recommend the EPAuto Drive Click Torque Wrench since it has proved reliable for most of them. It features an easy-to-read dual range scale that will allow you to set the torque values as per the requirements. Also, it emits an audible click sound when you’ve reached the ideal torque values, which will tell you the job is done even without you having to look to confirm.
In a few cases, rust and dirt may have somehow found a way into the steerer tube and can make it harder to lift the stem. However, you can force it to loosen up by clamping the front wheel between your knees and forcing the handlebar to turn left or right.
Nevertheless, this solution is not for all bikes. For some, the stem is too small to make enough of a difference. Consequently, another viable solution that doesn’t involve replacing the bike is incorporating an extender.
These extenders attach to the steerer tube and make it longer. As such, if you attach the stem to the newly attached steerer tube, the handlebar will end up much higher.
One other alternative involves buying a longer replacement stem and using it instead. They come in two configurations. The stiff ones and some with adjustable angles.
Nevertheless, when you’re picking a new stem, you need to ensure it matches both the size of the handlebar and the size of your steerer tube. Steerer tubes with a 1-1/8 diameter work with 25.4 mm stems, while those with a 25.4 mm diameter work with 22.2 mm diameter stems.
Also, sometimes replacing a quill stem or using an extender will force you to change the brake cables and replace them with longer ones as well. As such, you may end up having to take the bike to a repair shop so your breaks can be reinstalled professionally. After all, you don’t want them to fail when you need them most.
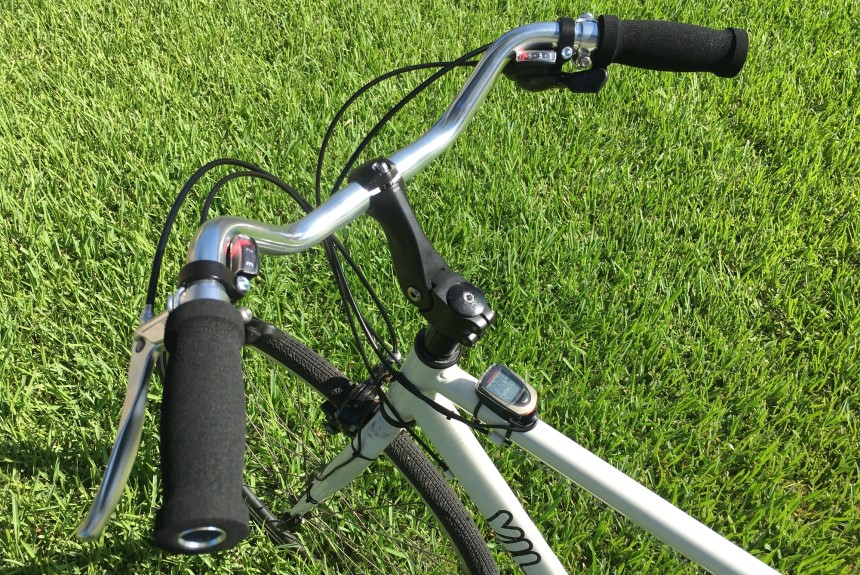
Here’s how to raise handlebars on a road bike: threadless stem variation. Threadless stem bikes are more common today, especially if you buy a higher-end road bike. In this configuration, the steerer extends past the top of the head tube while the stem clamps onto the outer surface of this extension.
They’re typically held in place by bolts on the back of the stem. Also, more often than not, they’re placed between spacer rings on the steerer that are made either from carbon fiber or aluminum. These spacers prevent the stem from sliding up or down the steerer.
 Consequently, what to do next should be fairly obvious. First, take the cap off the steerer tube. This will give you access to the spacer rings. You can remove them one by one until you reach the stem clamp.
After that, you loosen the bolts on the stem clamp so you can slide it off the top of the steerer as well. Follow up by replacing some of the spacers that were above the stem clamp back onto the steerer. You then replace the stem clamp, tighten it up, and add the remaining spacers on top of the clamp. Finish up by replacing the cap.
Notably, the more spacers you use below the clamp, the higher you’ll be able to raise the stem and consequently the handlebar. However, remember to take into account the top of the steerer tube as well.
If this doesn’t work, get a different stem. The differences may be in terms of the angle or length. Just like with the quill stem, you could even get one with an adjustable angle. That said, ensure the clamps on your new stem are the same size as on your old one.
If all these steps are insufficient to get you the height you want on your handlebars, there is one last resort. You can switch out your handlebar for riser bars. The bar grips on this option are naturally a bit higher than those of a flat handlebar. As such, they may help cover the difference to your ideal handlebar height.
You can raise handlebars on a Specialized bicycle by using stem spacers or a taller stem. However, it is recommended to consult a bike mechanic to ensure the process is done correctly and does not negatively impact the bike’s performance or safety.
Be extra careful with the brake cables, as your adjustments can cause issues in their operation. The same is the case with the headset, which is the bearing setup that allows you to turn the front wheel from side to side. Figuring out how to raise handlebars on a road bike is fairly easy. However, if your adjustments affect the headset or the brake cables, you may be putting yourself in danger. As such, if you’re not confident in your abilities to finish the project, you’ll likely be better off using a professional bike repair shop for the process.