- Trails
-
Bikes
-
Gear
-
Tips & Tricks
-
About us


When buying a bike for the first time, you’re likely only going to consider a few essential factors, such as what it looks like and if it’s comfortable to ride. Though these details are important aspects of bike riding, they won’t help if it suddenly stops working. You may also want to upgrade certain areas but won’t know where to start until you actually pay attention to the various pieces used to put the bike together.
To remedy this lack of knowledge, checking out a bike parts diagram and learning what each part does is essential. Doing so teaches you the importance of each component and how they all work together on the bike. You’ll also know how to diagnose issues or which pieces need to be swapped out for better brakes, faster speeds, or better control when riding.
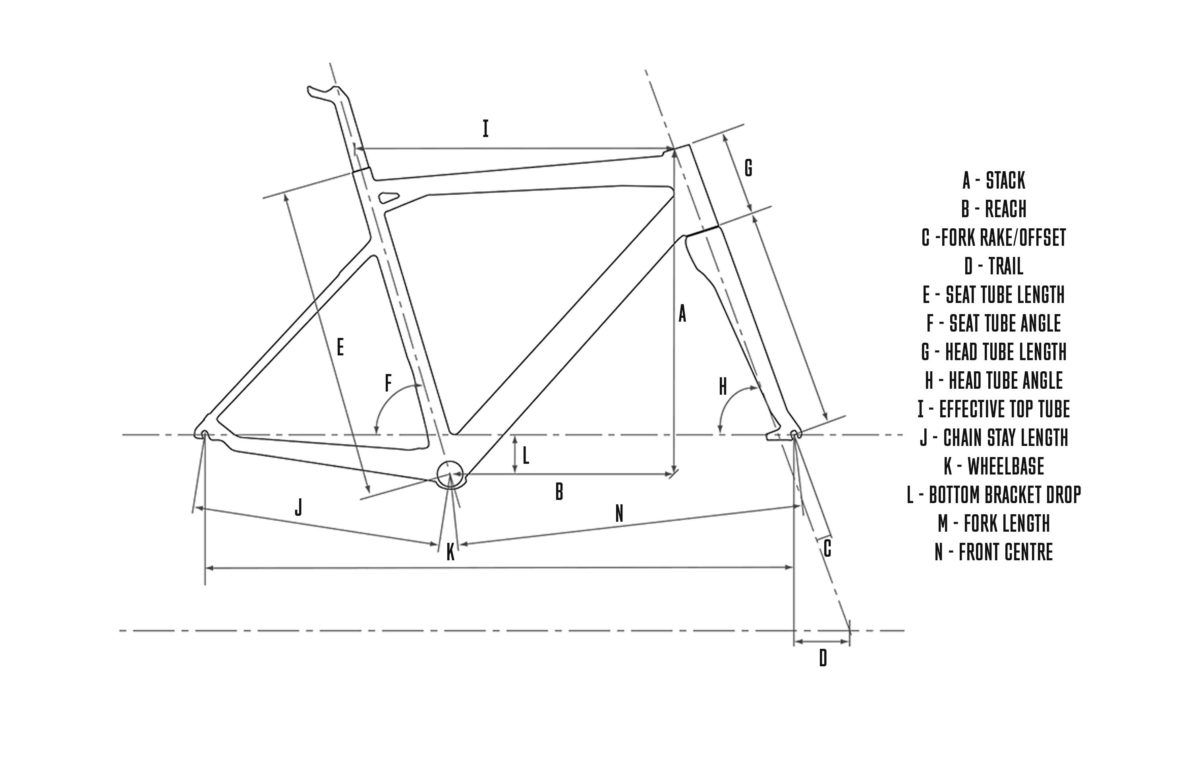
The bike frame is a crucial area since it’s the core of the bike and connects the rest of the parts. Several pieces make up the frame, and though there are different styles, the main structure remains almost identical in all bikes. Let’s take a look at the various frame pieces and what they’re for.
The top tube, also called the cross-bar, runs along the top of the frame. It connects the top of the head tube to the top of the seat tube. There are varying lengths for top tubes, depending on the style of the bike, each of which determines the position you’ll be in while riding. For instance, longer top tubes force you to lean further forward for a more aggressive ride, while shorter tubes increase comfort while reducing aerodynamics.
The down tube is below the top tube, though it has a dramatic slant to it rather than sitting parallel to the ground. Down tubes start at the head tube, connecting below the top tube, and run to the bottom bracket behind the pedals. These tubes are the thickest on the bike frame and are often used for logos and water bottle cages.
The seat tube is a vertical piece that connects the top tube to the down tube. As its name suggests, it holds the bike seat on top and meets the down tube at the bracket behind the bike’s pedals. The angle of the seat tube varies, depending on the type of bike you’re buying, which alters your sitting position during a ride.
Another important part of the bike parts diagram is the seat stays. There are two of these on every bike. They connect the back of the seat tube to the rear dropouts on the back tire. These pieces absorb vibrations and road shock while adding stability and support.
Like the seat stays, bikes include two chain stays, which run parallel to the ground on either side of the bike. Each one starts at the base of the seat tube next to the pedals and ends at the middle of the tire. The right-sided chain stay runs through the bike chain, which is where these pieces get their name.
The head tube is the smallest tube on the bike. It is located at the front of the frame, connecting the bike’s handlebars to the front wheel fork. It houses the pieces required to move the handlebars and front tire simultaneously when swerving or turning.
The fork consists of a steerer tube on top, which extends up into the handlebars through the head tube, and a blade on each side of the front tire. The blades connect to the axle of the tire and when the handlebars turn, the fork moves the tire the same way. There are rigid or suspension forks available, depending on the type of bike you’re riding.
Rigid forks are designed to increase speed when riding on flat surfaces. You’ll likely find them on a road bike parts diagram.
Suspension forks are best for bikes used on harsh terrain since they reduce the impact of bumps and rough spots on a rugged trail. When checking out a mountain bike parts diagram, you’ll see the suspension fork connecting the handlebars and front tire.
When you look at the front parts of a bike diagram, you’ll find most of the pieces related to navigating your bike and controlling the speed you’re riding. The following sections cover the various parts of this area of your bike.
The headset is located inside the head tube and consists of various parts that allow the front tire to rotate when the handlebars are turned. There are two cups, each of which contains a set of bearings that ensure smooth handlebar turns, and a top cap, which we’ll discuss more below.
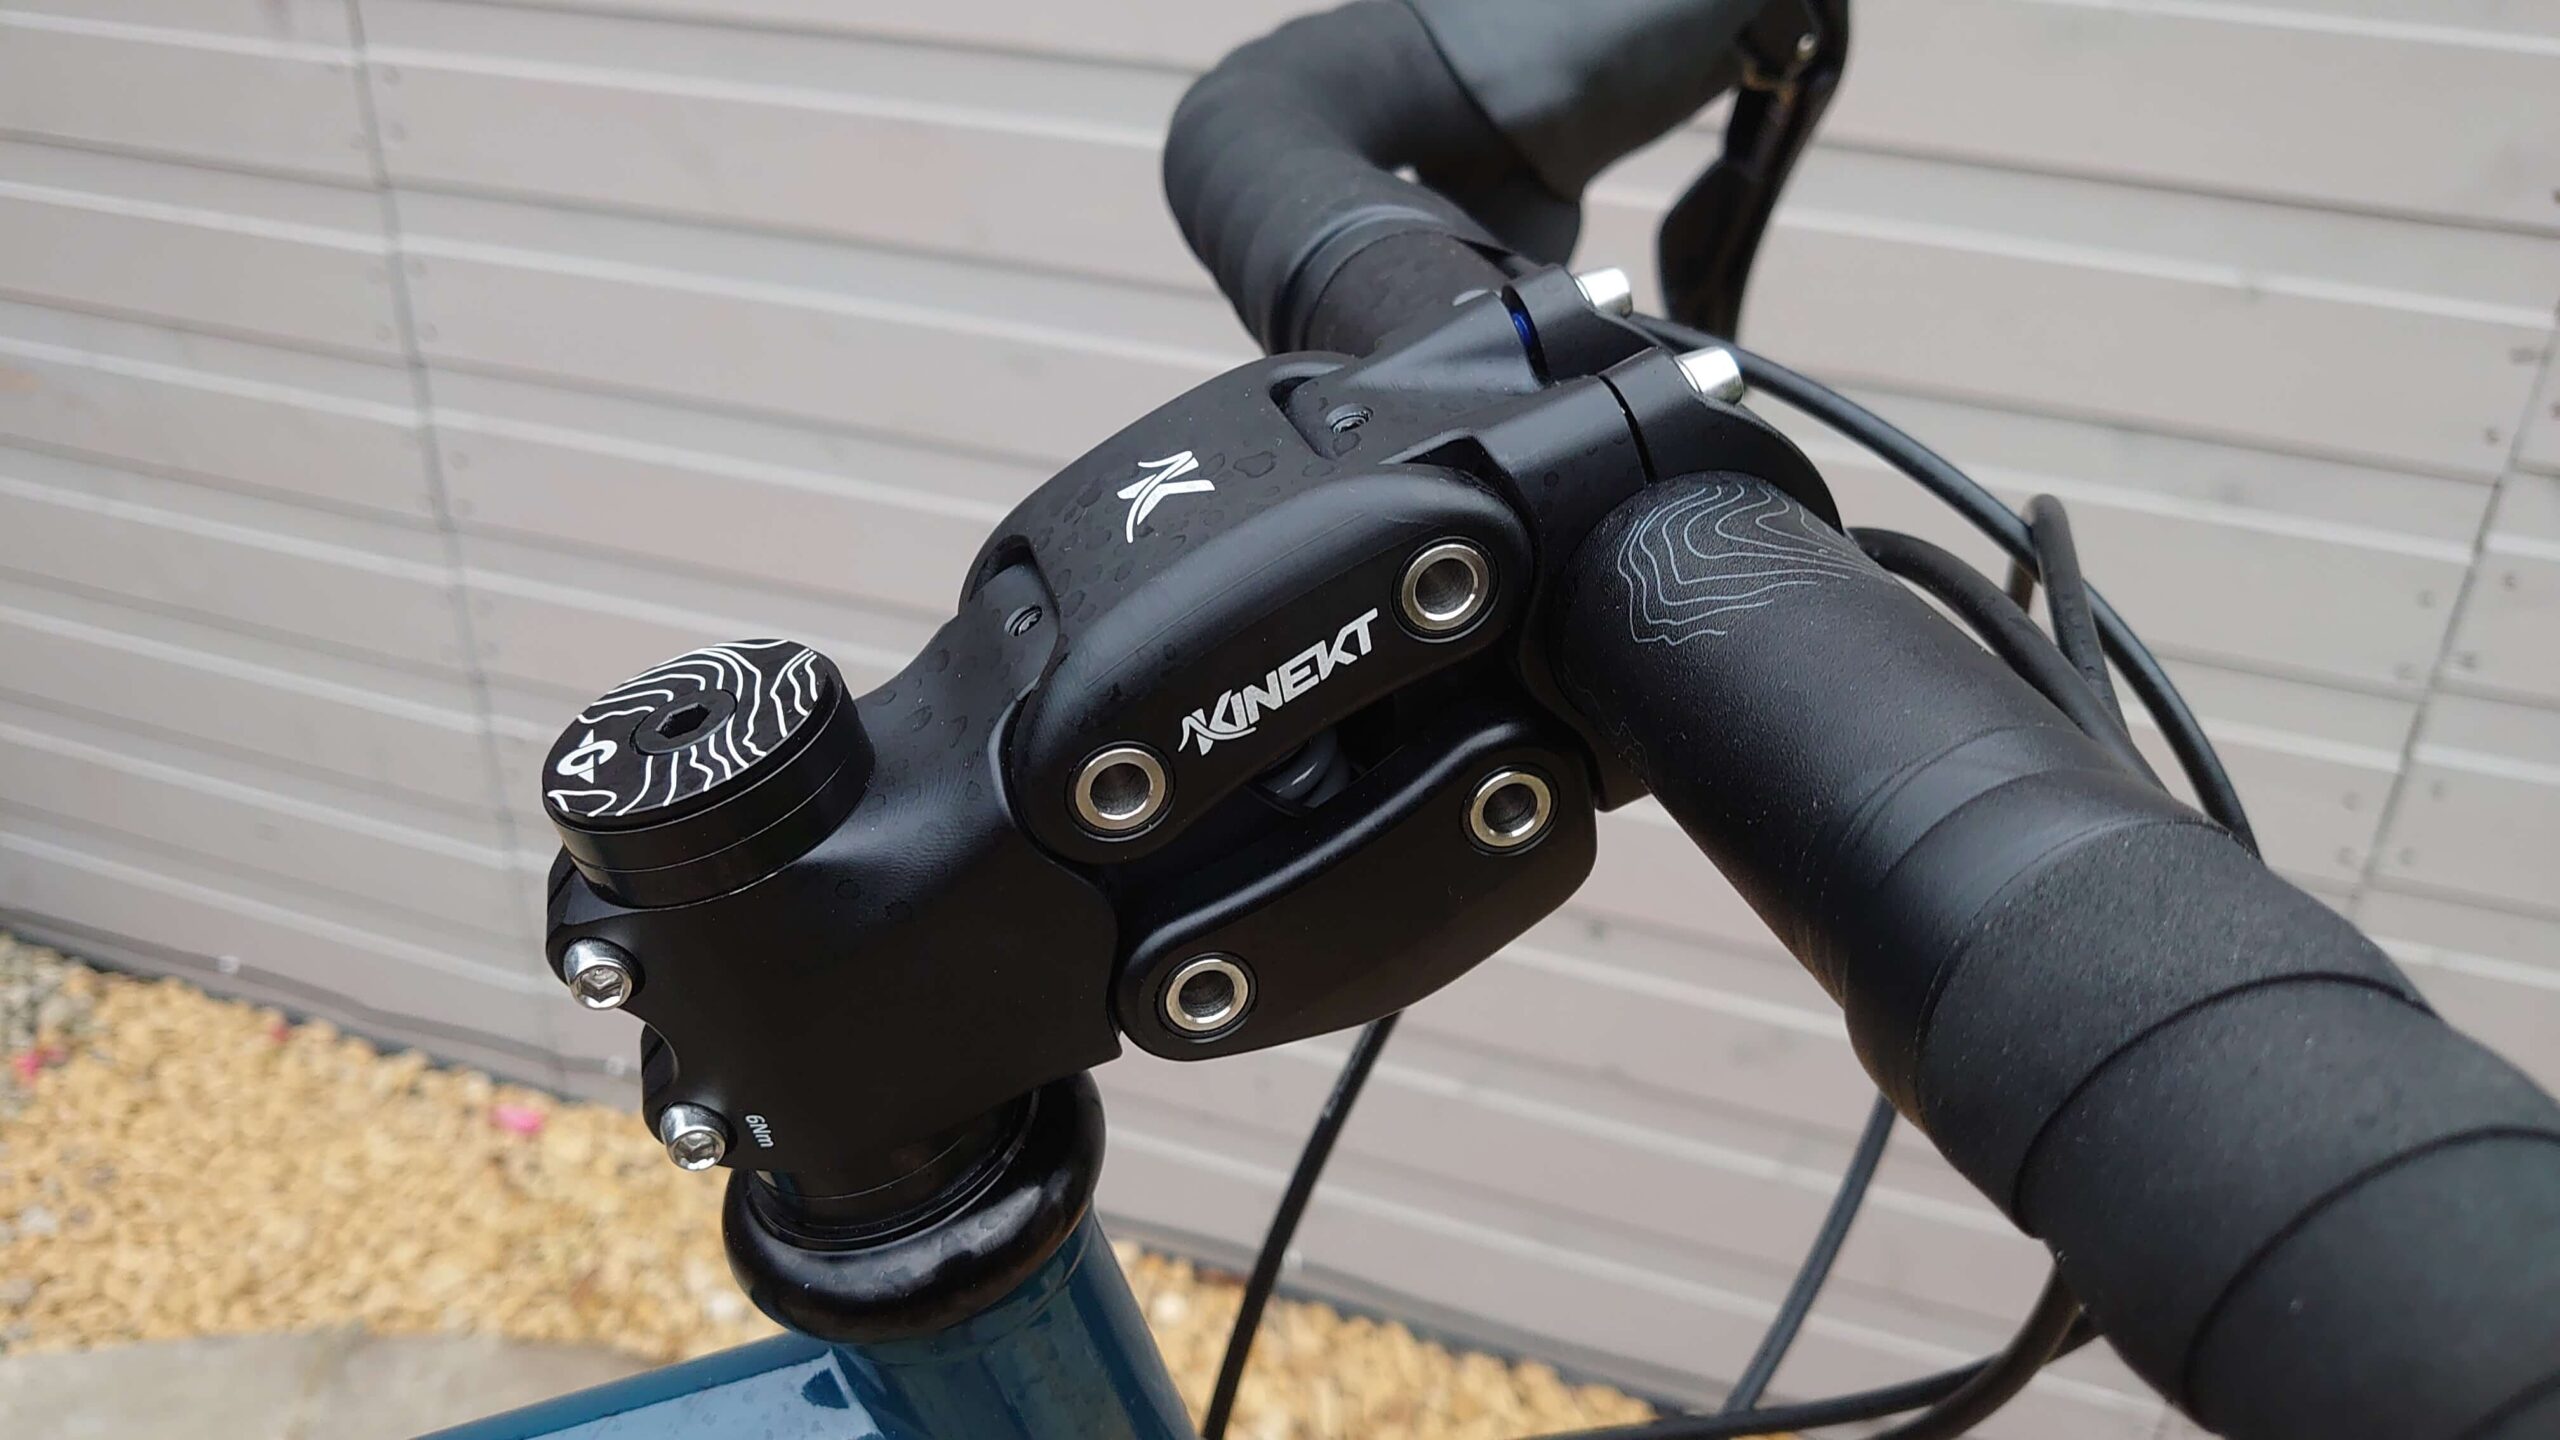
The stem is a crucial component of any bike since it connects the handlebars to the steerer tube at the top of the fork. It is this piece that controls how the tires rotate when the handlebars are turned to change the direction of the bike while you’re riding. Stems on modern bikes include several screws to hold them in place.
Also called top caps or stem caps, headset caps are used to maintain pressure on the headset to reduce play or movement. When properly tightened, this piece can be adjusted as needed to maintain proper control over the front wheel when turning the handlebars.
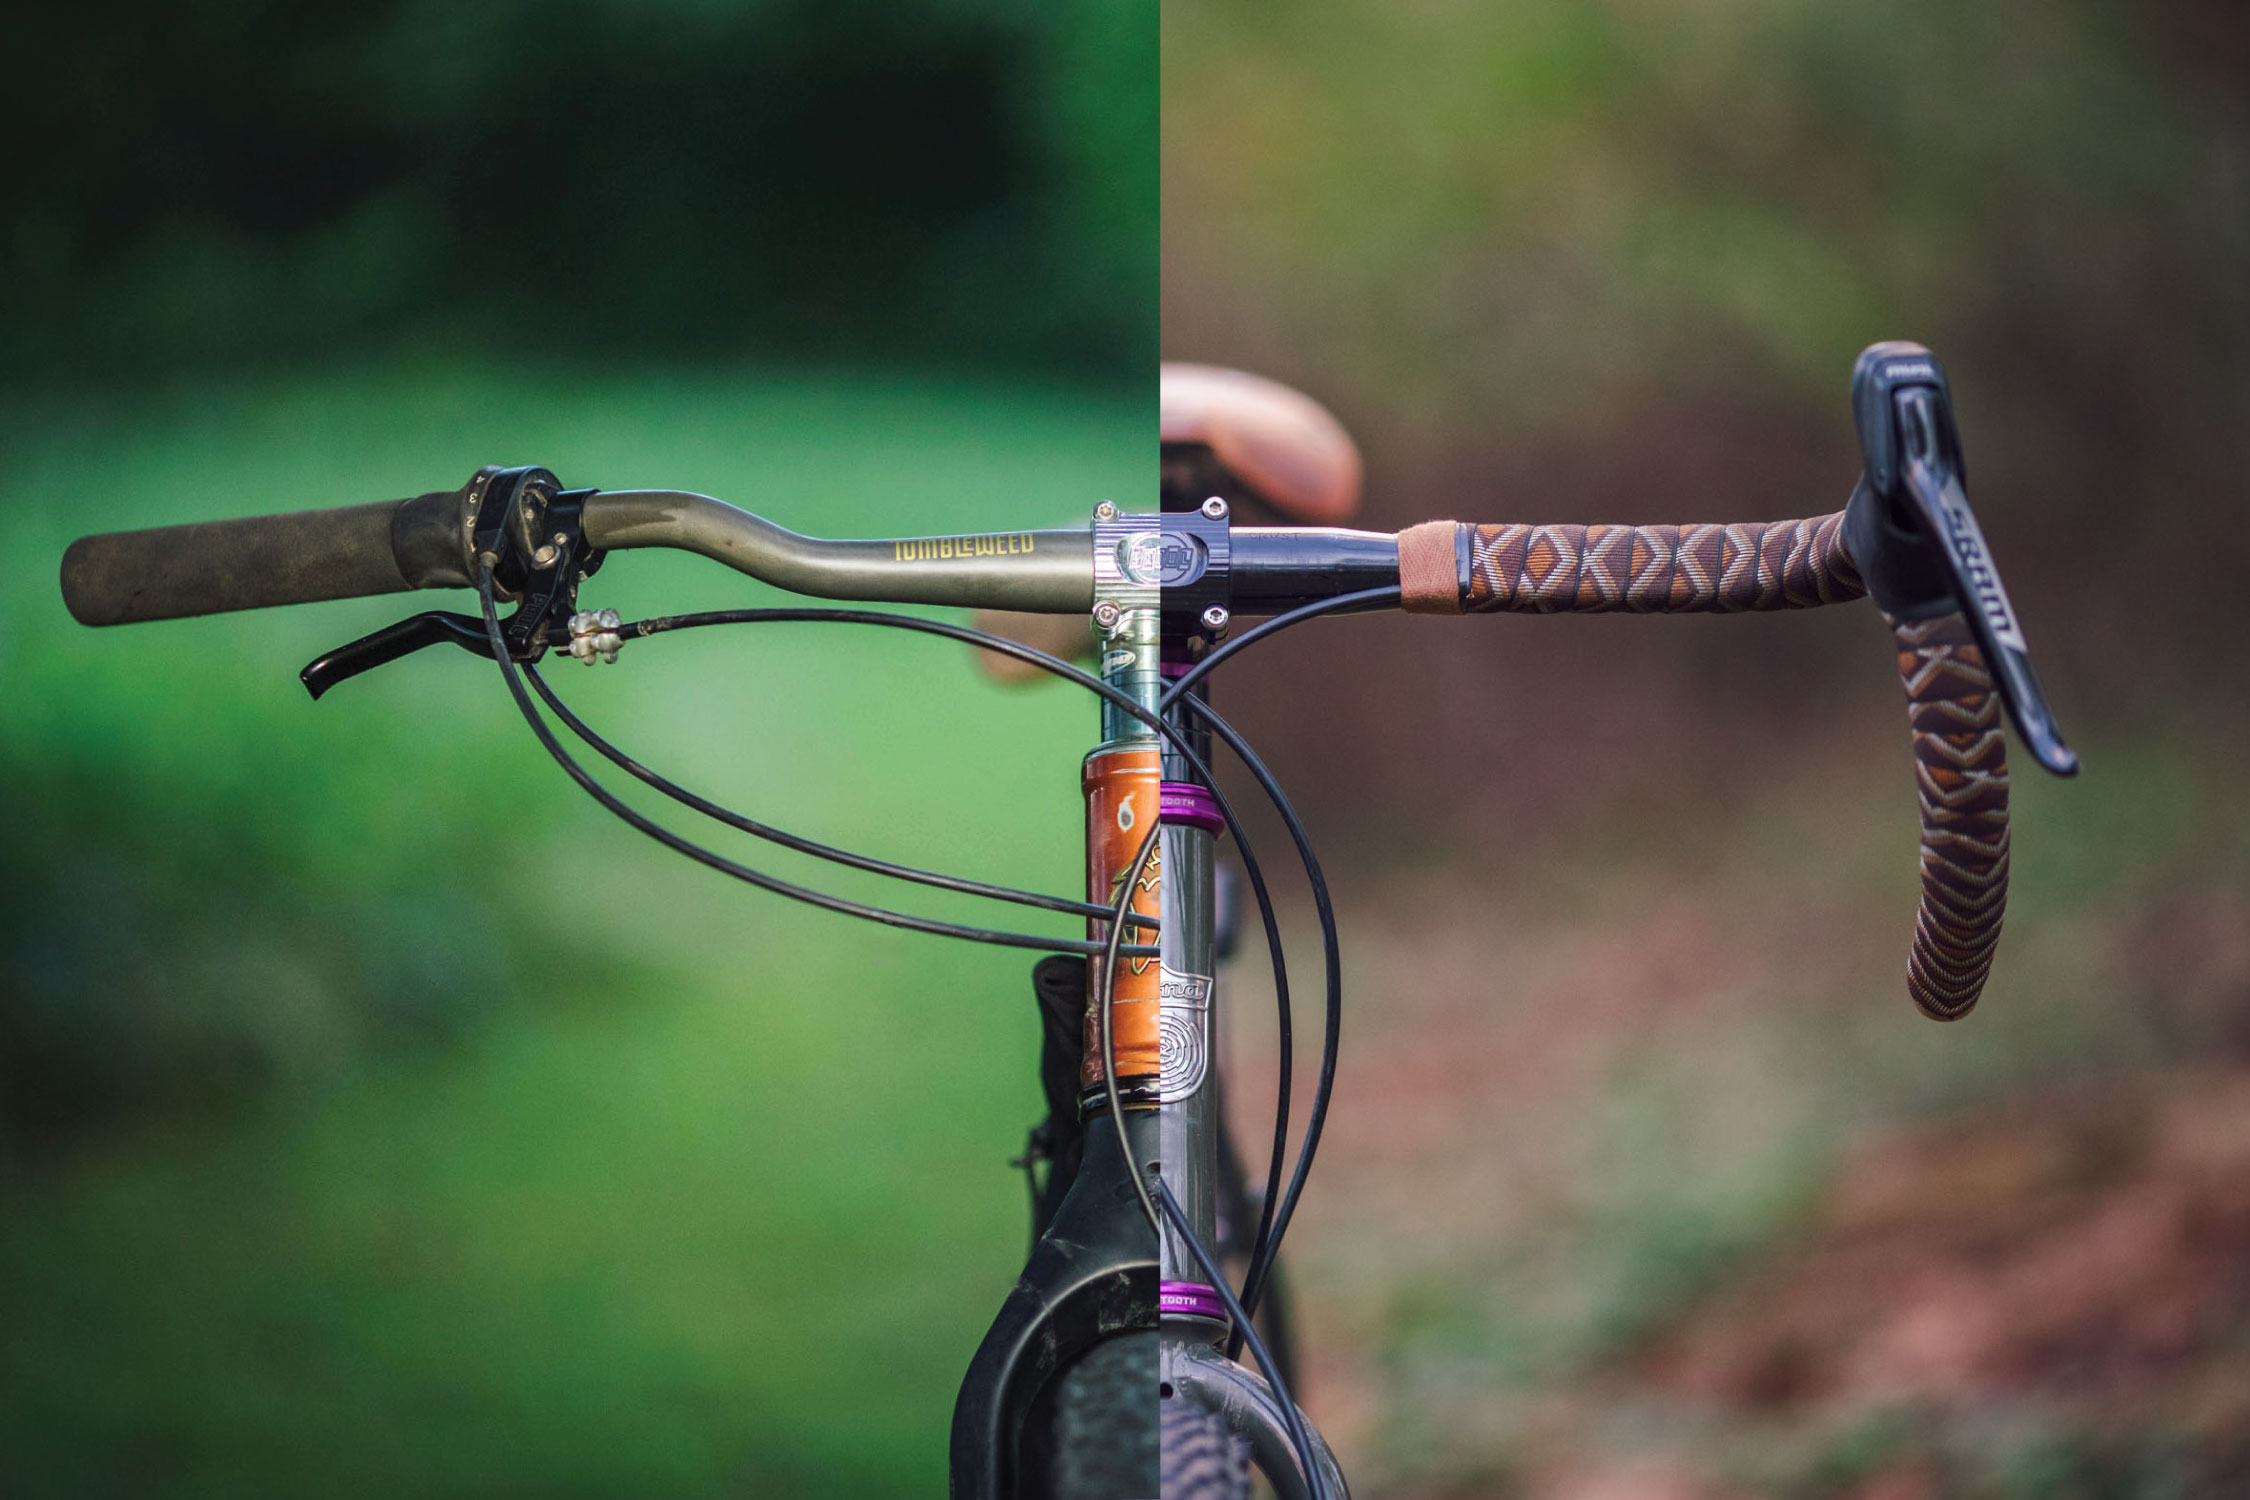
As the pieces allowing you to maintain control over the direction you’re traveling, the handlebars are one of the most vital parts of any bike. These attach to the stem, though some modern bikes have the handlebars and stem integrated into a single segment.
Brake levers are attached to the handlebars. They connect the brake cables to the brake calipers on the tires. When squeezed, the levers tighten the cables, which forces the caliper to press against the wheel rim or disc rotor. Doing so slows or stops the bike and prevents it from moving again until the lever is released.
Grips get their name from the fact that they are located where your hands grip the handlebars. They are usually made of textured rubber for a combination of comfort and control. The material also dampens the vibrations, even on rough terrain.
Bar tape is used for the same purpose, though instead of a solid piece, it can be wrapped around the ends of the handlebars for the perfect thickness and cushion. Like grips, it offers more security and control while riding.
Bar-end plugs aren’t essential pieces when it comes to the workings of the bike, though they are required for safety reasons. These pieces fit into the ends of the handlebars, covering the sharp, round metal edges. Though you may not notice them while riding, in an accident, they can prevent the open ends from cutting or puncturing the skin.
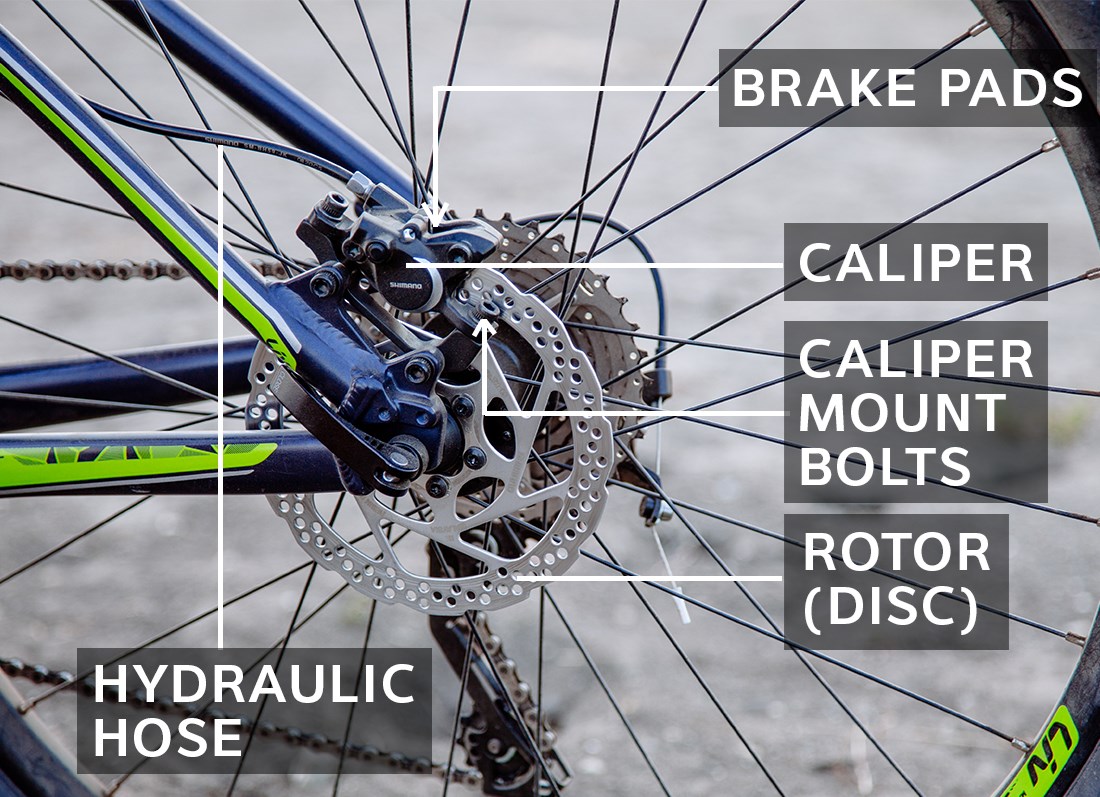
Brakes allow you to quickly slow or stop your bike, making them one of the most important pieces of any bike. Three types of brakes are available, depending on the type of bike you’re riding and when the bike was made.
Hub brakes are the traditional option, though they are rarely found on modern bicycles. For hub brakes to work, you need to pedal backward, engaging the brake in the rear wheel’s hub.
Rim brakes are available in three different styles, including caliper, cantilever, and V brakes. When engaged, a brake pad pinches the rim’s braking surface, slowing the tire’s movement. Though the more popular choice when it comes to bike brakes, they aren’t the best option for high-speed riding or wet terrain.
Disc brakes are the newest option for bike braking systems. When the brake lever is engaged, calipers pinch the disc brake rotors located on the outside of the wheel. Disc brakes are usually found on mountain bikes and are best for rough terrain or wet conditions. If upgrading the brakes on your bike, you can buy the pieces separately or purchase a full set. The JGbike Shimano MT200 MTB Hydraulic Disc Brake Set is a favorite among avid bikers since it contains all the levers, cables, pads, and hardware needed at a budget-friendly price.
Brake cables are the long cords connecting the brake lever to the rim or disc brakes. Though the cables on older bikes ran along parts of the frame, newer models have them housed inside to prevent damage and maintain their safety functions. When the brake levers are pulled, the cables tighten, forcing the brakes to engage.
The term 'bicycle' Trusted Source Bicycle Parts & Design There are many parts of a bicycle. The main parts of a bicycle are wheels, frame, seat, handle bars, and components. We also could consider the helmet as a key safety issue. depts.washington.edu was created by combining “bi”, meaning two, with “cycle”, which means turning. So, it was essentially those two spinning tires that gave this mode of transportation its name. Though these pieces are useless without the rest of the bike’s components, they do play a significant role, so let’s take a closer look at the pieces involved.
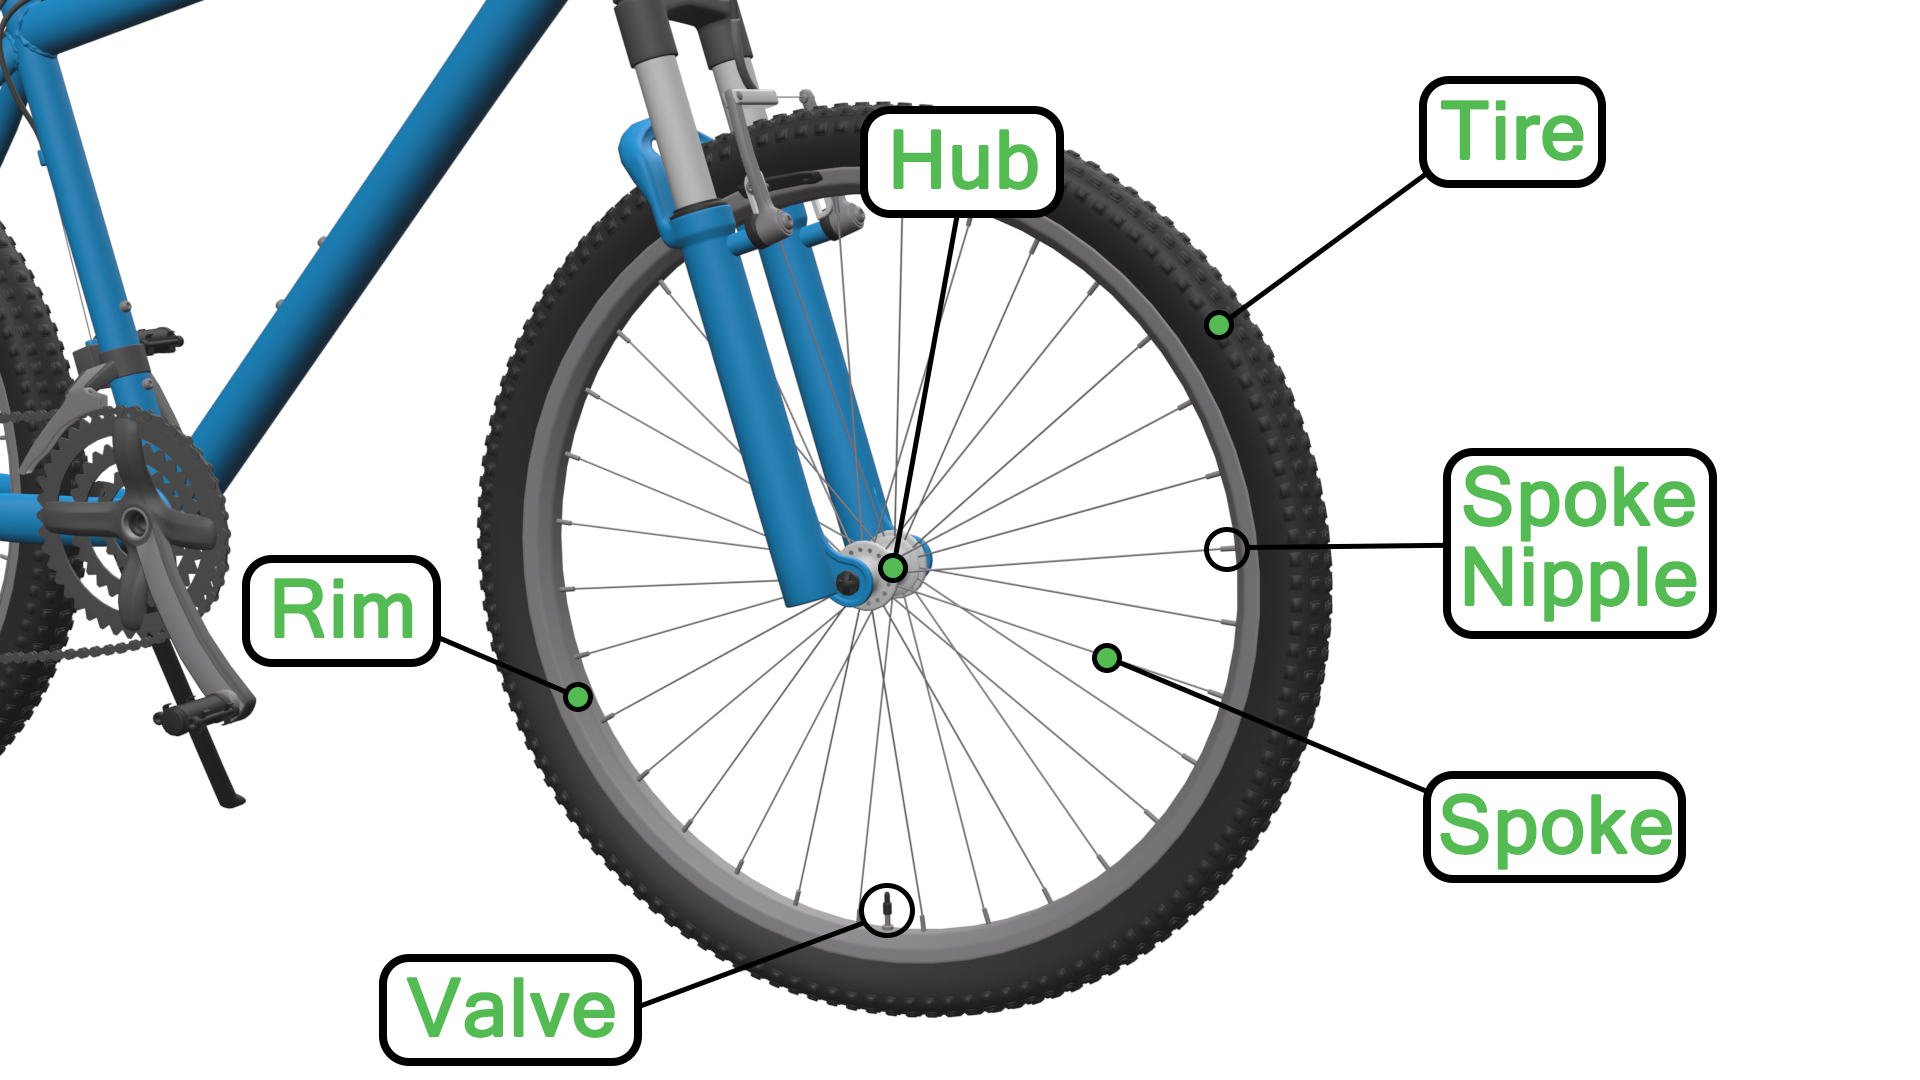
The hub is the centerpiece of a bike tire. Inside the hub are bearings, which ensure the wheels turn freely while you’re riding. Each hub is made up of five components, which we’ll discuss below.
As its name suggests, this piece is the hub’s outer shell and contains the internal parts of the hub. It is also the center point for the spokes to connect to.
The wheel’s axle runs through the middle of the hub and rests on those internal bearings, which are designed to keep the tire rotating smoothly. The axles connect to the dropouts on either side of the tire, which in turn connect to the seat stays. Hub axles come in two types, quick-release and through, so you can choose the one that works best for your needs.
As mentioned above, the ball bearings are housed in the hub and designed to keep the tires on a bike turning smoothly. It’s easy to tell when these pieces are worn out since that turning motion will become rougher.
Cones are only located on adjustable hubs and are used to alter the bearings inside. If the cones are too tight, the wheel won’t turn properly, while loose cones cause wiggling in the hub.
Lock nuts are the components that hold the cones in place after they’ve been adjusted. They are designed to prevent the cones from coming loose after you’ve tightened them properly. When using lock nuts, it’s best to do so carefully to avoid accidentally tightening the cone in the process, which can affect how the wheel turns.
The rims are the metal pieces between the tire and the spokes. They are usually made of aluminum, due to their lightness and durability. These pieces also vary in thickness, with thinner rims offering better aerodynamics and speed, while thicker rims are stronger for rugged terrain. Rims used with rim brakes also include a smooth surface area for the brakes to grip, though these aren’t needed for disc brakes.
The spokes are thin pieces of metal set between the rim and the hub of a tire. Though they look light and weak, the spokes support the weight of both the bike and the person riding it and are much stronger than they look. Of course, to do their job, the spokes require proper installation and tension to prevent misshapen wheels or damage to the parts they connect to.
The spoke nipples connect the spokes to the wheel rim. These little pieces are threaded right into the rim of the tire. When the spoke is inserted, the nipple is tightened to increase tension on the hub to ensure the wheel maintains its shape. Nipples need to have the same threading as the spokes, so they are often sold together.
Tires are the rubber pieces covering the rim and are the only pieces touching the ground while you ride. They come in several types, depending on the style of the bike. For instance, wide tires with heavy treads are used on the best mountain bikes to increase traction and reduce vibrations on rugged terrain. Thinner treads have little traction, though they increase speed, so are best for road bikes. When choosing tires, there are three options to consider.
Clinchers are the standard tires found on bikes due to their low price and general-purpose use. They are paired with clincher rims, with metal inner beads attaching the two and an inflatable inner tube.
Tubular rims are most common on road and racing bikes. They are glued to the tire’s rims and have no sidewalls to deal with, reducing their limitations while increasing shock absorption.
As their name suggests, tubeless tires lack the inner tube of other tires. Instead of air, the tires contain a sealant that maintains the shape and resists punctures. Many tubeless tires work with clincher wheels, though some require special rim strips for an airtight seal. The downside is the price, which is higher than other tire types, though tubeless tires require fewer repairs and replacements.
The valves are small pieces on the inside of the tire’s rim, between a couple of the spokes. Air is added to the tire through the valve on the clincher and tubular tires. There are two valve types, Shrader and Presta. The Shrader valves feature a spring-loaded pin, which must be depressed to open the valve and inflate the tire, and are found on cars and motorcycles as well as bikes. Presta valves are used exclusively on bicycles and have thinner inlets and pressure seals, so are smaller and less complex.
The bike’s drivetrain system is located on the back of the bike and contains several complex pieces designed to keep your bike moving at consistent speeds. The following sections cover the pieces involved.
Cranksets, also known as chainsets, feature three components. These include the chainrings, crank arm, and bottom bracket. The pedals are attached to the crank arm, which extends from the chainrings. The chainrings are used to transfer the chain when switching gears on a multi-speed bike and include up to three rings. When you pedal the bike, the chainrings turn, spinning the back tire.
The bottom bracket secures the crankset to the bike’s frame. It contains ball bearings, which allow the cranks and spindle to turn freely when you pedal the bike. These pieces vary in quality, with cheaper models only offering about 5000 miles of use before wearing out, especially with poor maintenance or frequent rough riding conditions.
Pedals are the pieces on a bike used to propel it forward. When you place your feet on them and push, the crankset is engaged, pulling the chains and turning the back wheel. The harder you push, the faster the bike moves. The most common pedal type is the platform or flat pedal, which has a flat top to rest your feet on and is the best pedal for a gravel bike. Clip-in pedals require special shoes, which connect to the pedal for a firm grip.
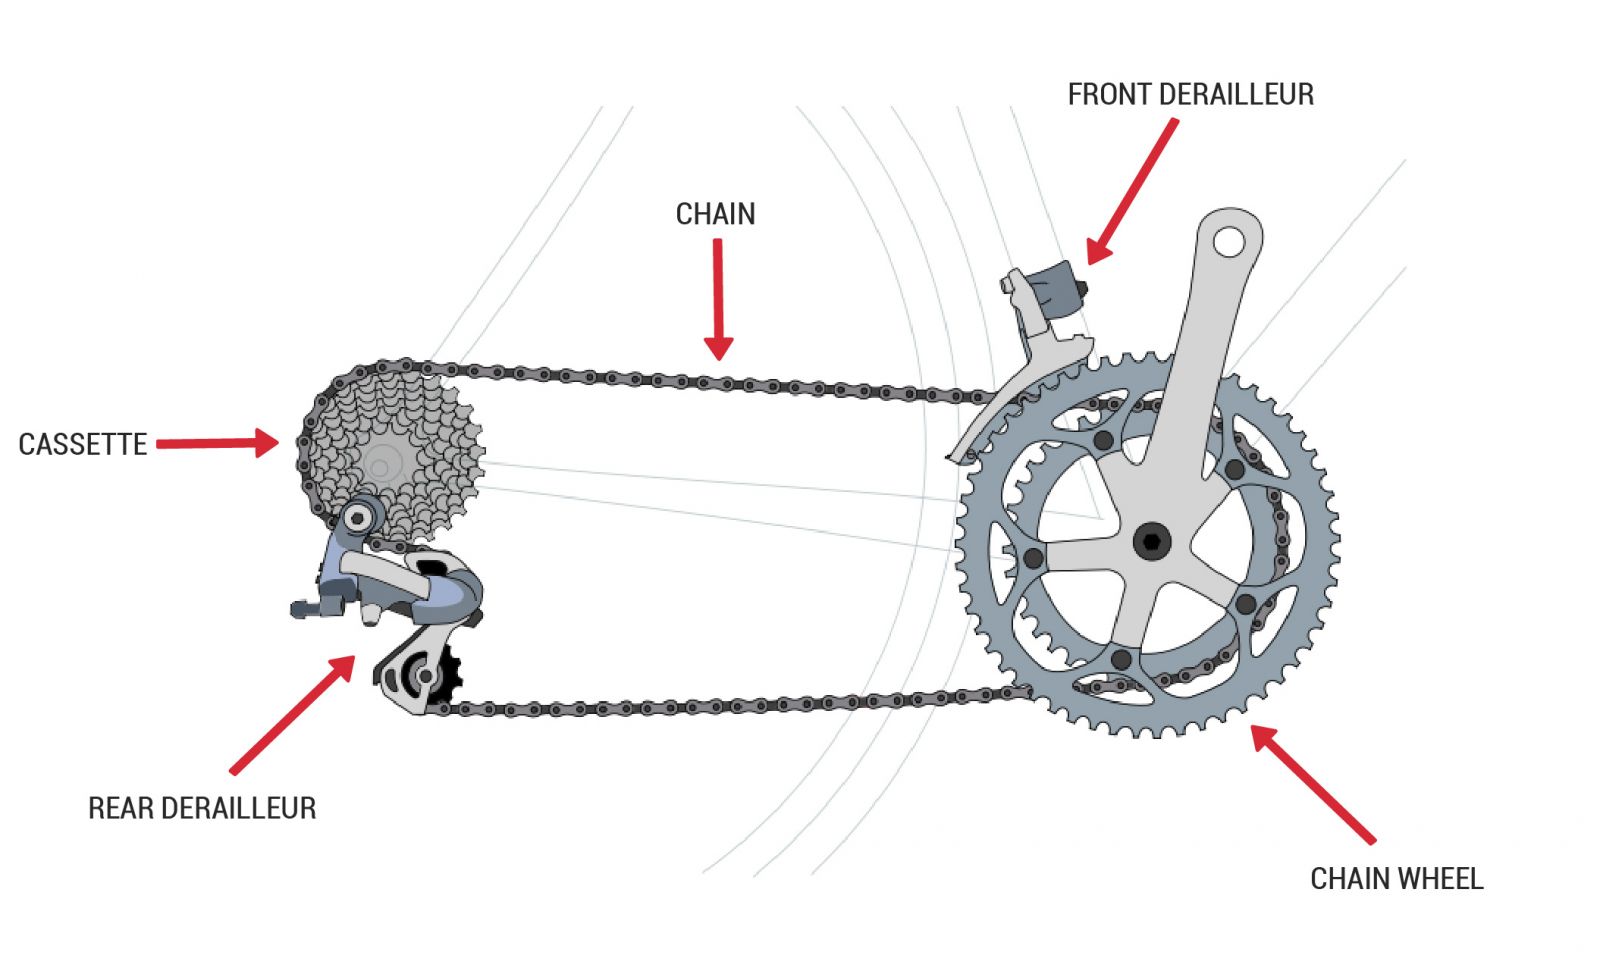
The front derailleur isn’t found on single-speed bikes, though it is crucial for multi-speed bicycles. When you change gears, the front derailleur shifts the chain from chainring to chainring.
The bike chain rests on the chainrings and rear-wheel cassette. When you pedal the bike, the crankset rotates, pulling the chain with it to turn the rear wheel and propel the bike forward. Without the chain, the bike won’t move, no matter how fast you pedal. Standard bike chains usually last up to 2500 miles with regular cleaning and lubrication. Such care is essential since bike chains are responsible for the majority of bike accidents Trusted Source Injuries associated with failure or malfunction of bicycle parts 0 October 1994 There was a total of 1,083 cases of injury in the database of approximately 50 Australian hospitals since 1986 in which a bicycle part was reported to have failed or malfunctioned. www.aihw.gov.au when they break or come loose, so check them frequently to prevent injury.
The rear derailleur has a similar function to the front derailleur since it moves the chain to a new position when shifting gears. The difference is that the rear piece shifts the chain to a new sprocket on the cassette instead of the crankset. As the chain shifts, it loses slack, which the rear derailleur corrects by automatically adjusting the tension.
The rear derailleur contains two jockey wheels, and though they look alike, they serve varying purposes on a bike. The upper jockey wheel or guide pulley guides the chain as it switches to a new sprocket on the cassette when changing gears. Doing so causes the chain to lose tension, which the lower jockey wheel, also called the tension pulley, corrects.
Though a single-speed bike only requires a single cog for the chain, a multi-speed bike features a cassette or cogset containing multiple cogs or sprockets of varying sizes. This piece is attached to the rear wheel’s hub. When shifting gears, the rear derailleur moves the chain onto a new cog on the cassette. Cassettes vary in cog amounts, with the most common option containing 8 to 11 sprockets, though pieces with 5 to 13 sprockets are also available.
Biking is a fantastic activity with several benefits, such as improving heart functions, lung health, blood flow, muscle strength, and weight loss Trusted Source Biking to Lose Weight: Cycling Tips for Weight Loss Biking can help you burn fat, torch calories, and lose weight. But, in order to lose weight, you need to know how to approach your biking workouts the right way. www.healthline.com . Of course, if you want to gain these benefits, you’ll need to cycle at moderate speeds for at least 30 minutes. To do so, you’ll need a proper seat to maintain your comfort level while you ride. The following sections cover the seat area of the bike.
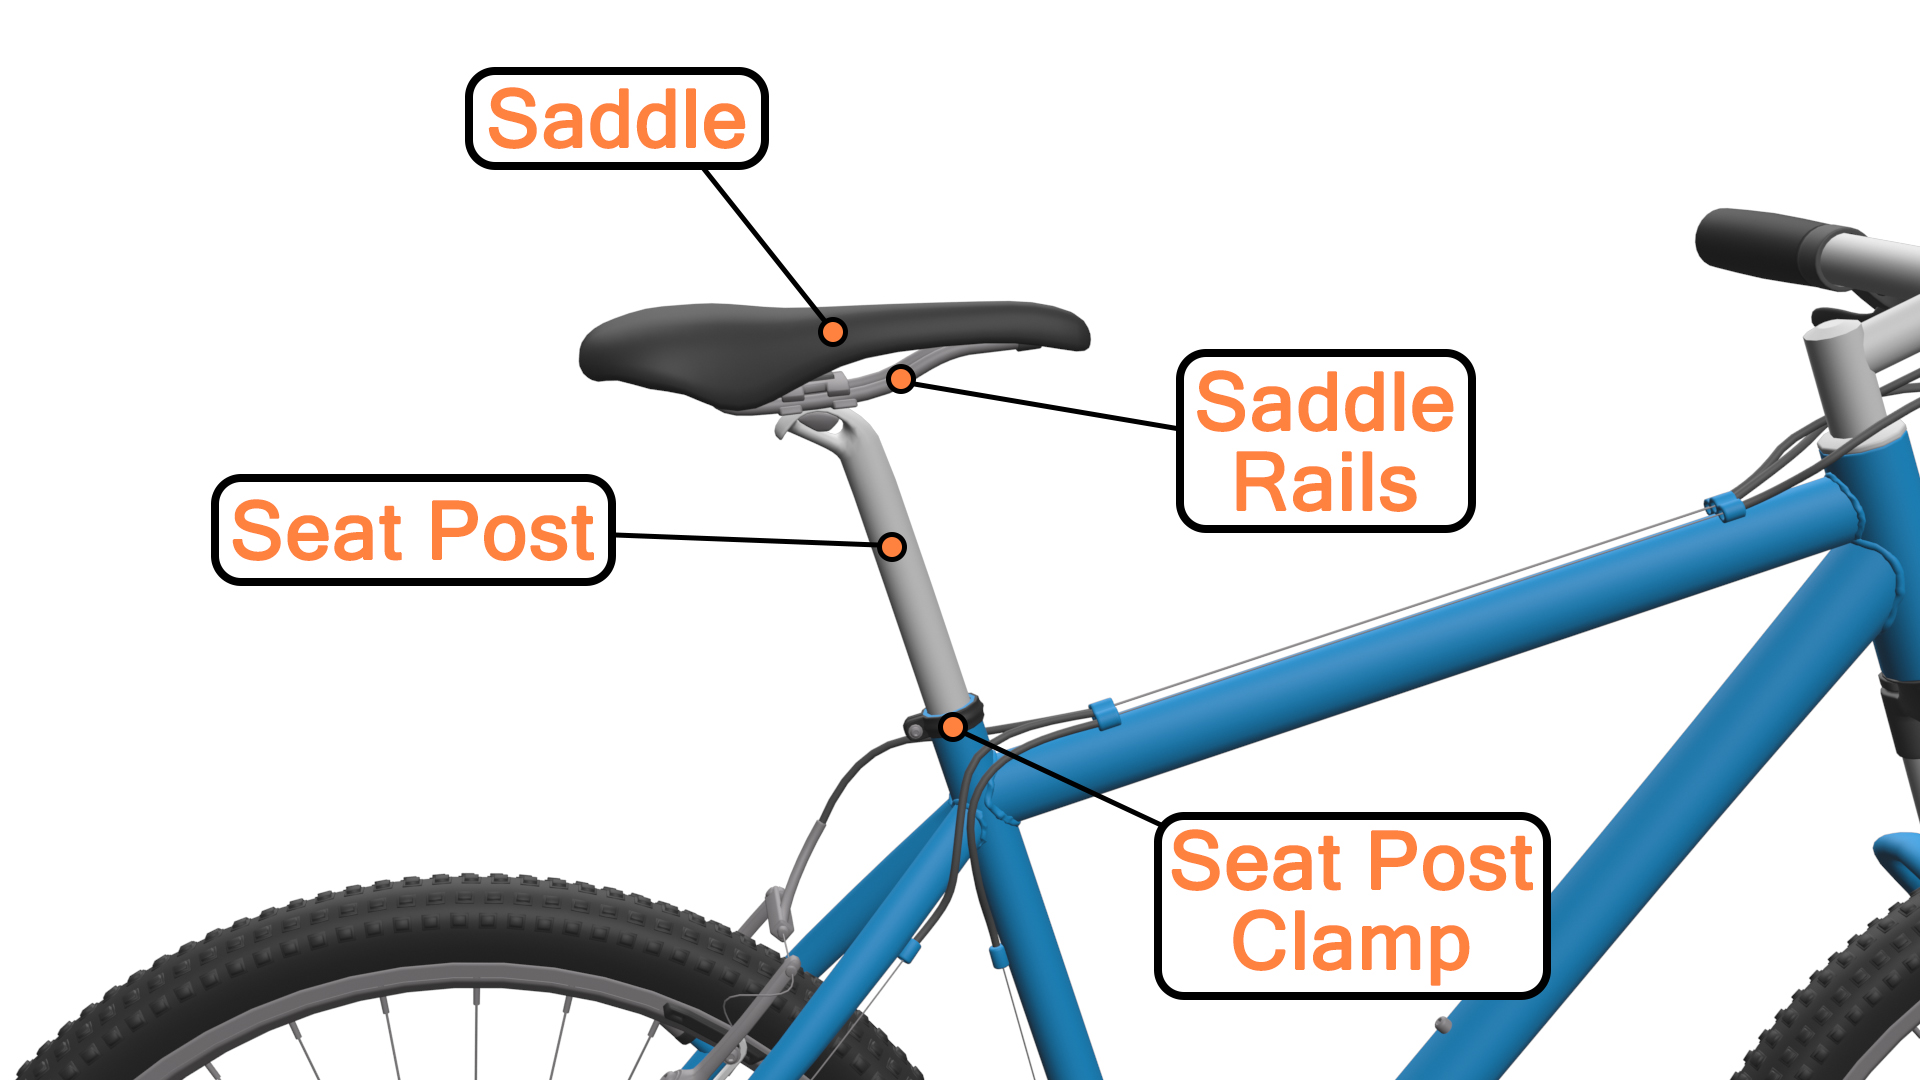
The saddle, more commonly known as the bike seat, is where you sit when riding your bike. They come in varying shapes and sizes to fit an array of posteriors and alter your comfort level. The thin, streamlined seats don’t offer much padding, though they are streamlined for lower weight and higher speed. The wider, thicker seats are more comfortable for those long, leisurely rides.
The saddle rails are thin metal bars positioned on the underside of the seat. These connect the saddle to the top of the seat post using the saddle clamp. The rails also include measurements to help you position the saddle properly.
There are several names for the seat post, including seat pins, seat pillars, saddle pillars, or saddle posts. Regardless of what you call it, is the piece that connects the underside of the saddle to the seat tube. The seat post is adjustable, so you can alter the height for the most comfortable riding position. There are limits to how high the seat can sit, so pay attention to the minimum insertion markings to avoid overextending the post and damaging the bike. Most seat posts are rigid, though the best suspension seat posts absorb the shock from bumpy terrain, reducing stress on the back.
At the top of the seat tube is the seat post clamp, which is the metal collar you would loosen to adjust the seat post height and then tighten again to lock it in place. Some can be adjusted using a hand mechanism, while others require tools to loosen and tighten the clamp.
It’s difficult to determine which part of the bike is most important since so many of the pieces and mechanisms play an essential role in ensuring it works properly. The frame is what brings it all together and is the foundation of the bike. The front section works together for steering and control, while the back parts keep the bike moving smoothly.
For that reason, it’s believed all bike parts are crucial and have the same value.
Yes, you can upgrade various parts of your bike, though it isn’t the easiest task. Many bike components require specific settings or adjustments to work properly. If you aren’t sure how to do so, you could damage the pieces or alter how the bike works. Learning about the parts, how to swap them out, and what the best replacements are is essential for this task. You also need the right tools to upgrade or repair your bike. For instance, the Portland Design Works 3 Wrencho is made of heat-treated steel with a plastic coating to prevent damage when prying off rims or removing axle nuts.
Cheaper bikes are budget-friendly options for beginners, though the upgrades are pricey and may not be compatible with every model. An expensive bike may have a higher up-front cost, but the upgrades are cheaper and easier to find. A quality bike can also handle regular use, so you can use it for all your needs. Doing so lowers car expenses Trusted Source Health Benefits of Bike Commuting Biking to work can have several physical and mental health benefits. It’s also good for your pocket and the environment. Here’s a quick look on how to get started. www.webmd.com , including insurance, maintenance, and gas, so it may be worth the cost of a better bike in the long run.
If you’re buying a bike for the first time, you may not be aware of the dozens of parts making up your new form of transportation. Every one of these pieces is essential to how a bike works, though, so it’s in your best interest to study the components before jumping on your new bike and going for a ride. Doing so has a few benefits you may not even consider.
First, learning the bike parts diagram can help you determine what’s run if your bike’s performance is lacking. You’ll also know which components need maintenance to ensure everything works smoothly. If a part needs repairs or replacements, or if you just want to upgrade to something better, knowing what each piece does will help you determine which ones need to be swapped for new parts. Our guide is the first step, so read carefully for happier riding.